|
Click here for Word version (great for printing) 5.
Installing the software
Insert
the software CD into your drive. Double-click the file SETUP.EXE if the setup
program does not start automatically. Follow the instructions on the screen.
The setup program will give you the option of restarting your computer if
required to enable certain features. 6. Running the application The first time you launch the Software application, you will be asked
to select a camera. Select your camera from the list or select NO CAMERA if
you want Software to move but not view your camera. Clicking the bottom left arrow shows you the available controls. You
can display tool tips describing the controls by moving the mouse pointer
over them. The right panel displays camera video and includes the basic movement
control buttons. The question mark button at the top of the right panel displays the user
guide. 7.
Limitations
Keep away
from dust and moisture. Supply power with Universal Serial Bus (USB 1.1 or
above) only. Not applicable for critical usage or hazardous environments.
Operate at temperatures between 32ºF and 132ºF (0ºC and 55ºC) only. This
device is designed for indoor use only. |
|
Heavy Duty Base Thank
you for purchasing the Heavy Duty Remote Control Base. This QuickStart Guide
is meant to get you up and running as quickly as possible. For detailed
documentation, see the user guide included on the software CD. Contents of this document: 1 What’s in the box2
What’s NOT in the box 3
Requirements 4
Hardware setup 5
Installing the software 6
Running the application 7
Limitations 1.
What’s in the box?
The full retail package contains
the following items: ·
Heavy Duty Base ·
Software CD (contains Software software, documentation,
FAQ files, useful links) ·
USB cable ·
Warranty card ·
QuickStart guide 2.
What’s NOT in the box?
·
Heavy Duty Base is an accessory for your camcorder or
webcam. We do not manufacture cameras; we give them mobility. Our products
are meant to work with your existing camera. A camera is NOT
included. ·
To ensure stability when using Heavy Duty Base with a
camcorder, you must use a camcorder tripod. A camcorder tripod is
not included. · It is up to you to interface your camera’s video to your PC using a Firewire interface or a video capture card. No video interfacing equipment is included. |
3. Requirements ·
CD-ROM drive ·
32 MB of RAM ·
20 MB of free hard disk space ·
Windows 98SE, ME, 2000, or XP ·
Digital
video camcorder ·
Camcorder
tripod 4. Hardware Setup 1. Screw
the camera shoe, shown in Figure 1, into the ¼” screw thread on the bottom of
your camcorder. 2. Mount
the Heavy Duty Base onto your camcorder tripod, treating the Heavy Duty Base
as if it were a camcorder and following the directions that came with the
tripod. Do
not continue without mounting your Heavy Duty Base on a tripod. The weight of
a camcorder may cause the Heavy Duty Base to tip otherwise. 3. Plug
the flat end of the USB cable into your computer’s USB port. 4. Plug
the other end of the USB cable into the USB connector on the back of the
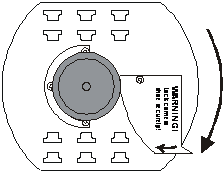
Heavy Duty Base. 5. Move
Heavy Duty Base’s lock lever counter-clockwise to its open position. 6. Lower
your camcorder onto the Heavy Duty Base, guiding the camera shoe into the
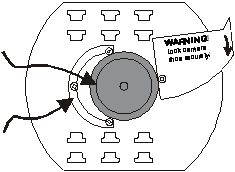
space between the shoe guide and the lock lever as shown in Figure 2. 7. Move
the lock lever clock-wise all the way to its closed position, as shown in
Figure 3. You should feel the camcorder click into place. 8. Make sure that your camcorder feels firmly
locked into place. If it does not, repeat steps 6-9. Do
not attempt to use your Heavy Duty Base before you are sure that your
camcorder has locked into place securely. |
Figure 1. The camera shoe -----------------------------------------
Figure 2.
Lowering the camera onto the Heavy Duty Base, guiding the camera shoe into
the space between the shoe guide and the lock lever. ----------------------------------------- Figure 3. Closing the lock
lever ----------------------------------------- |