Table of Contents
About
General Information about Multi-Cam Software.
Cost
System Requirements
What your system requires for various setups and cameras.
Installation of Software
Notes on the installation of Multi-Cam Software.
Use of Software
Guide to using Multi-Cam Software.
The Software Settings
Guide to Fine tuning Multi-Cam Software's Operation.
The Basics
What is Multi-Cam Software?
Multi-Cam Software is software that allows you to view and control multiple cameras at
the same time on the same screen.
Each individual screen display in Multi-Cam Software has features which allow you to
detect and track motion. The system can capture stills of the selected input
display, as well as capture surveillance videos, and replay them using the
[surveillance viewer].
When the system is installed, you can watch and access all of your cameras, and
control the Pan/Tilt/Zoom on all cameras that are attached to a Remote Control Base.
What Can I do with it?
Multi-Cam Software is a digital video recording and surveillance monitoring system. With
Multi-Cam Software, you can connect to multiple cameras from the same graphical user
interface, while maintaining individual settings for all the separate video
feeds.
Some of the features of Multi-Cam Software are:
-
Multiple Surveillance recording
Multi-Cam Software allows for multiple recordings to occur at the same time from
different video feeds into separate files on your computer's hard drive. The
frame rate for recoding is also adjustable and the user is able to set a
limit for hard drive space used.
-
Connect to and control multiple cameras
Allows you to connect to multiple video feeds all on one display unit, which
means you have total control
over your environment.
-
Motion detection for all displays
This allows you to capture video to disk only when there is motion. You can
individually set each camera to capture after a certain amount of motion has
been detected.
-
Various Layout for Display Interface
You can change the Display screen to suit your individual needs, with
various placements for each video display. Each video feed can be selected
and highlighted as the main feed or put onto the side as a sub-feed.
-
Ability to connect to both Local and Remote feeds
Now you can connect to multiple feeds on both the Local Computer as well as
Remote Computers, allowing you
more surveillance on a single screen.
-
Instant Playback.
There is no longer a need to change tapes or rewind/forward to find footage.
From within Multi-Cam Software or any time, use the Surveillance Viewer to instantly
access video and still frames by selecting date/time and sliding your cursor
back and forth along the time scale at any speed.
| General | Requirements
| Installation | Use |
Software Settings | Top |
System
Requirements
System Requirements:
Works with computers running Windows® 98 Second Edition, Millennium Edition,
2000, and XP operating systems. At least one Remote Control BaseTM
(on the first camera) is required to unlock video capture.
Minimum Memory:
128MB of system memory and 20MB of free space on your hard drive is required.
256MB is recommended for 4 video feeds and below. For more video feeds, 512MB is
recommended for best performance. Each camera will typically require
approximately 30GB of disk space for each week of video surveillance capture.
Results will vary depending on frame rate and amount of motion.
Processor Speed:
Minimum requirement of Pentium. II 400MHz. For best performance, with 4 video
feeds and below, a Pentium. III 733MHz is recommended. For the more video
feeds, an Intel/AMD processor beyond 1.4GHz is recommended.
Interface:
Remote Control BaseTM is a USB 1.1
compatible device and it can be used on a USB 2.0 port. Some USB hubs do no
provide enough current to power the Remote Control BaseTM.
We recommend connecting directly to a USB port on your computer.
Camera Compatibility:
Multi-Cam Software is compatible with WDM cameras including USB (1.1 and above), Firewire
(also called IEEE 1394 or i.Link), and most analog cameras connected to a
capture card with WDM drivers. Avoid USB cameras that do
not support more than one device at a time. Also for analog camera support,
we recommend the use of Hauppauge® WinTV-Go Model 700 capture card. Multi-Cam Software
includes special code to support multiple Hauppauge® cards.
| General | Requirements
| Installation | Use |
Software Settings | Top |
Installation of
Software
Installing Multi-Cam Software Software:
-
Have your Windows CD handy and plug Remote Control BaseTM
into a free USB port or hub using the supplied cable.
-
Install software by inserting the Multi-Cam Software CD or from folder and running
setup.exe, (if it doesn't start up automatically). If you downloaded the
software, simply run the downloaded file.
-
Follow the on-screen instructions given by the setup program.
-
In Windows 2000 and XP, you may be asked a question about installing a
driver. Please click on Continue.
-
If required, the setup program will give you the option of restarting your
computer to enable certain features.
| General | Requirements
| Installation | Use |
Software Settings | Top |
Use of Software
Multi-Cam Software software requires some previous software configuration
experience. But don't worry, all the features and options will be examined
throughout the duration of this help file.
TrackerCam. and Multi-Cam Software can not be run simultaneously on the same computer, so
please be sure to turn off TrackerCam if you intend to run Multi-Cam Software.
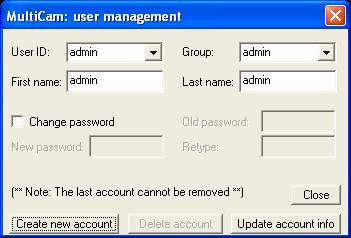
User ID and Accounts:
For security reasons, software setting changes require a password. By default
a login called "admin" has been created with password
"admin". You should change this password in User Management (see
Figure 1).
[Fig. 1]
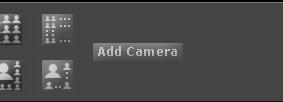
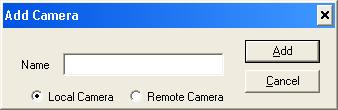
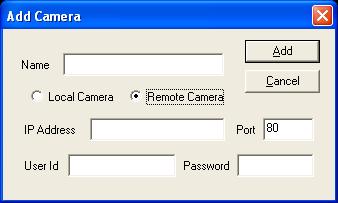
Add a Camera to the display:
The very first thing you should do is add a camera/Remote Control BaseTM
to the display. Click on the [Add Camera]button. Input a name that you
wish for the camera feed. There should also be two options, one for a [Local
Camera] (Fig. 3) and another for [Remote Camera] (Fig.
4) . If your camera is connected directly to your computer or
via a USB hub, select [Local Camera]. If the camera is located on another
computer, obtain the address and port number of the camera as well as
login/password and select the [Remote Camera] option.
[Fig. 2]
[Fig. 3]
[Fig. 4]
Now that you have your setup for a camera done, a section of the Multi-Cam Software
should
now display the newly added camera/Remote Control BaseTM.
|Top|
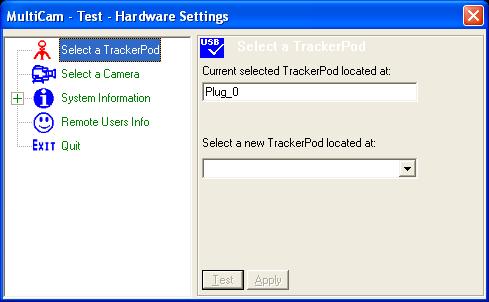
How to set up the newly added Camera:
Click on the display to set it as the active input (the box will become blue
around the display to show that it is selected.)
At the top right of the display there should be a small box with three lines,
click on it once to get a menu for the setting of the camera.
The Hardware configuration (Fig. 5) allows the user to view
and change the currently selected Remote Control BaseTM
and the video feed.
All the software configuration option screens include full explanations. See the
Software Settings section for
detailed information.
[Fig. 5]
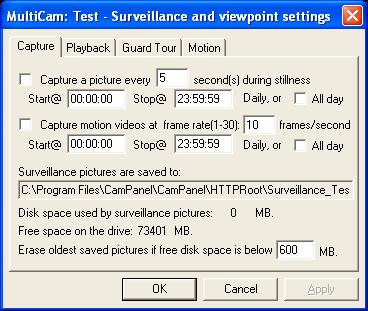
Surveillance Feature:
To activate the surveillance timer/feature, open the menu of the selected
display. A window labeled [MultiCam:{Your cam name} - surveillance and
viewpoint settings] (Fig. 6) should appear. The
very first tab, entitled, [Capture] will have the input settings for the
user to activate the surveillance settings (either capturing stills or motion
video.)
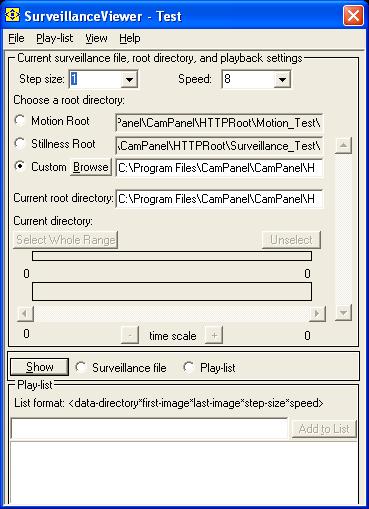
The surveillance videos can be accessed by using the [Surveillance Viewer],
which can be opened from the same window as above. Choose the [Playback]
tab and select the button labeled [Surveillance Viewer] (Fig.
7). The Surveillance Viewer can also be run directly from Windows Explorer
anytime.
[Fig. 6]
[Fig. 7]
|Top|
Pan/Tilt Functions:
The Remote Control BaseTM attached to
the selected camera can be controlled via the up, down, left, right arrow keys.
You can also control the digital zoom feature by using the + and - keys. Another
option is Mouse Movement: Holding the left mouse button down while the mouse is
over the video window lets you move the camera by dragging the mouse.
Display Screen:
The display screen is where you can lay out all your video feeds for monitoring.
Each individual feed has its own hardware and software settings. Below are
a few of the possible display arrays:
|Top|
Motion Detection
To activate motion detection, select the desired video feed, open the menu on
the top left of the video feed, and select tracking. A sub menu will open
up allowing you to select [Track Motion]. Notice the red and
white motion indicator at the bottom left corner of the video feed. This
tells you motion detection is active. To adjust the motion detection
threshold, slide the green sensitivity selector located right next to the motion
indicator. You may also adjust the threshold through the software settings.
(Fig. 8)
[Fig. 8]

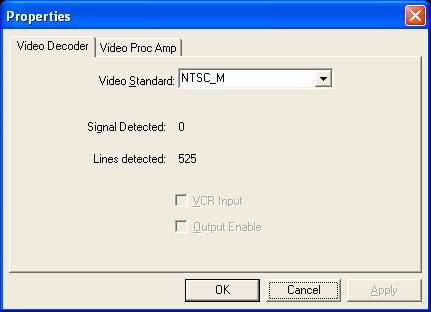
NTSC/PAL Setting:
This applies only to analog cameras connected though a capture card. For
North American cameras, the video standard is NTSC. In Europe and parts of Asia,
the video standard is PAL. To change this setting, open the system menu
(top left of the video box) and under [Video Settings], select the
[Properties] option. From that point on, please select the correct standard
for the camera/country you are in. (Fig. 9)
[Fig. 9]
| General | Requirements
| Installation | Use |
Software Settings | Top |
Software Settings
Functions:
Software Settings let you adjust Multi-Cam Software and Remote Control BaseTM's
advanced settings. The setup defaults are reasonable for most users. Each
section has detailed explanations of all the options and features. Note:
You must click the top left corner of a video window and select Software
Settings to access the following pages.
Startup:
Save or restore current or startup settings, change settings and save them.
Communications:
Set user privileges, on/off line, surveillance, see connected users.
Display:
Set video size.
Camera:
Select camera, specify field of view.
Tracking:
Set tracking speed, timeout, viewpoint order.
Remote Control Base:
Select a Remote Control BaseTM, set
home position, motor limits, step size, timeout, lights.
COST
IMPORTANT:
If you have purchased or will
purchase one or more of our remote control bases then
your Multi-Cam Software License is FREE and it is activated by simply owning and connecting a remote control base.
For those who do not need the remote control ability (no remote control base),
then you need to buy the Multi-Cam Software which will include a Multi-Cam Key (a small
USB dongle, for $99.00), to
buy click here.